
Cisco Adaptive Security Appliance (ASA) firewalls protect your network through powerful Access Control Lists (ACLs). These security rules filter network traffic by permitting or denying packets based on specific criteria, ensuring your critical assets remain protected. This guide walks you through everything you need to know about implementing effective ACLs on Cisco ASA firewalls.
What Are ACLs in Cisco ASA?
Access Control Lists on Cisco ASA firewalls consist of ordered rules that filter network traffic by either permitting or denying packets based on specified conditions. Each permit or deny statement is called an Access Control Entry (ACE), which examines Layer 3 through Layer 4 headers to evaluate:
- Source and destination IP addresses
- Protocol types (TCP, UDP, ICMP, etc.)
- Port numbers
- Connection states
How ACLs Work in Cisco ASA
ACLs follow a structured processing approach:
- Rules are processed sequentially from top to bottom
- Each packet is compared against ACE conditions until a match is found
- When a match occurs, the firewall takes the specified action (permit or deny)
- No further comparisons happen after the first match
Every ACL includes an implicit "deny all" at the end that rejects any traffic not explicitly allowed. This default deny is only enforced if at least one user-defined rule exists in the ACL.
Default Traffic Behavior
By default, Cisco ASA allows traffic from higher to lower security-level interfaces without requiring an ACL. However:
- Traffic moving from a lower to a higher security-level interface requires explicit permission
- Creating an ACL for high-to-low traffic overrides the implicit permit
Return traffic must be explicitly allowed in the ACL for connectionless protocols like GRE, ESP, and ICMP.
Key Characteristics of Cisco ASA ACLs
1. Interface-Based Filtering
ACLs only filter traffic passing through an interface—they cannot filter traffic originating from or destined to the ASA itself.
2. One ACL Per Direction
Only one ACL can be applied per interface in each direction (inbound or outbound). Multiple ACLs in the same direction are not permitted.
3. Layer 3 & Layer 4 Filtering
ACLs operate at the Network Layer (Layer 3) and Transport Layer (Layer 4) to filter by IP addresses, protocols, and ports.
4. First Line of Defense
ACLs serve as the first security measure in a firewall, blocking unwanted traffic at the network perimeter.
Applications of ACLs in Cisco ASA
Cisco ASA uses ACLs for multiple security functions:
- Security Filtering: Control traffic flow between networks
- Routing Control: Define which routes are advertised via routing protocols
- Quality of Service (QoS): Prioritize bandwidth for critical applications
- Policy Enforcement: Implement business rules by controlling service access
Types of Packet Filtering in Cisco ASA
Through-the-Box Traffic Filtering
This filtering applies to traffic flowing through the firewall between networks. It controls:
- Traffic between internal networks and the internet
- Communication between different security zones
- Cross-interface traffic flows
Through-the-box filtering uses interface-based ACLs to determine which traffic can transit the firewall.
To-the-Box Traffic Filtering
This filtering applies to traffic destined for the Cisco ASA itself, including:
- Control plane traffic (routing protocols)
- Management access (SSH, HTTPS, SNMP)
- Administrative connections
This type of filtering secures the firewall itself from unauthorized management attempts.
Types of ACLs in Cisco ASA
Cisco ASA supports several ACL types for different security requirements:
- Standard ACLs: Filter based on source IP address only
- Extended ACLs: Filter based on source/destination IP, protocol, and ports
- Time-Based ACLs: Apply rules according to schedules
- EtherType ACLs: Filter based on Layer 2 protocol types
- WebType ACLs: Filter web traffic in Clientless SSL VPN environments
- Global ACLs: Apply to all interfaces in the inbound direction
This article focuses on standard and extended ACLs, which are the most commonly used types.
Standard ACLs on Cisco ASA
Standard ACLs primarily identify packets based on source IP addresses, though they can sometimes match traffic based on destination IPs in specific scenarios.
Key Use Cases for Standard ACLs
- Split Tunneling in VPNs: Define which destination networks are included in a VPN tunnel
- Route Redistribution: Filter which routes are advertised between routing protocols
Limitations of Standard ACLs
- Cannot be applied directly to interfaces for traffic filtering
- Only available in routed mode (not in transparent mode)
- Limited to source IP address filtering in most cases
Standard ACLs serve specific purposes but offer less functionality than their extended counterparts.
Extended ACLs on Cisco ASA
Extended ACLs provide more granular control by filtering based on:
- Source IP address
- Destination IP address
- Protocol type
- Port numbers (source and destination)
Key Use Cases for Extended ACLs
- Granular Traffic Filtering: Create precise controls between network segments
- VPN Traffic Selection: Specify exactly which traffic should flow through VPN tunnels
- Traffic Inspection: Allow specific protocols while blocking others
- Application Access Control: Define rules for applications based on destination IPs and service ports
Limitations of Extended ACLs
- Increased Complexity: More detailed filtering requires a more complex configuration
- Performance Considerations: Filtering on multiple attributes can increase processing overhead
Extended ACLs offer the most flexibility for controlling traffic but require careful planning.
Understanding ACL Direction in Cisco ASA
ACL direction is crucial for proper security implementation:
Ingress vs. Egress ACLs
- Ingress (Inbound) ACLs: Applied to traffic entering an interface
- Example: Filtering traffic from the outside network before it reaches the internal network.
- Egress (Outbound) ACLs: Applied to traffic leaving an interface
- Example: Controlling outbound traffic from an internal
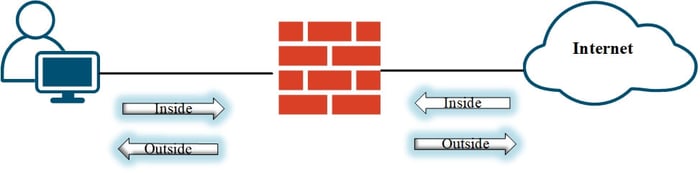
To understand ACL direction, imagine standing inside the interface facing outward. Traffic coming toward you is inbound, while traffic moving away is outbound.
Security Impact of ACL Direction
- Ingress ACLs filter unwanted traffic before it reaches internal resources
- Egress ACLs control what internal traffic can exit the network
Configuring Extended ACLs on Cisco ASA
Extended ACL Syntax
Access-list [name][extended] [action] [Source IP] [Dest IP] [Port/Type]
Where:
- Action: Permit or Deny
- Protocol: TCP, UDP, ICMP, ESP, GRE, OSPF, EIGRP, etc.
- Source/Dest IP: Source or destination host/network address
- Port/Type: Application port or ICMP packet type
ASA creates a default extended ACL if you don't specify the "extended" keyword.
Applying ACLs to Interfaces
Access-group [ACL Name] [Direction] Interface [Interface Name]
Where:
- ACL Name: Name of the ACL to apply
- Direction: Inbound or outbound
- Interface Name: Interface where the ACL will be applied
Practical Configuration Examples
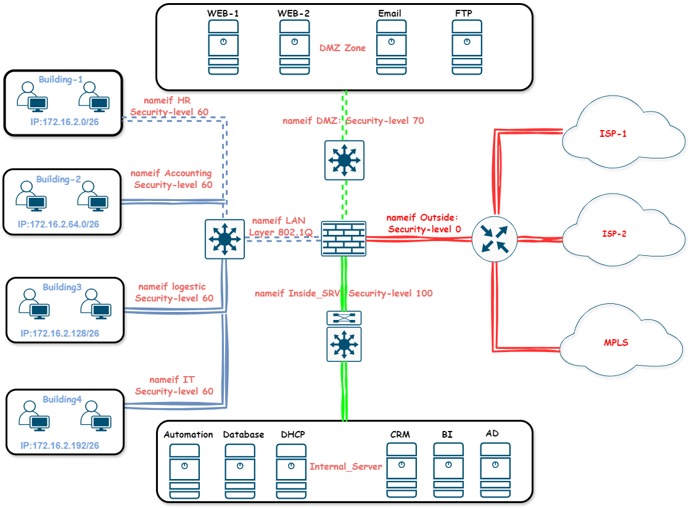
| Name | IP Address | Prefix | VLAN | DG | Zone Name | Security Level |
|---|---|---|---|---|---|---|
| DMZ | 172.16.1.0 | 24 | 10 | 172.16.1.1 | dmz | 70 |
| HR | 172.16.2.0 | 26 | 20 | 172.16.2.62 | hr | 60 |
| Accounting | 172.16.2.64 | 26 | 30 | 172.16.2.126 | acc | 60 |
| Logistics | 172.16.2.128 | 26 | 40 | 172.16.2.190 | logis_net | 60 |
| IT | 192.168.2.192 | 26 | 50 | 172.16.2.254 | it | 60 |
| Internal Server | 172.16.3.0 | 24 | 60 | 172.16.3.1 | int_srv | 100 |
Example 1: Allowing Low to High Security Access
In the diagram above, HR clients need access to the WEB server 1 in the DMZ. Since traffic moving from a low-security level to a high-security level is denied by default, we must establish an access list to allow traffic from the HR zone to the DMZ.
Step 1: Create the access list.
access-list hr_dmz_web7 extended permit tcp 172.16.2.0 255.255.255.192 host 172.16.1.7 eq 80
Note: Cisco ASA uses a standard subnet mask, not a wildcard format, such as 255.255.255.0, in extended ACLs.
Note: eq filters traffic based on specific port numbers for TCP or UDP protocols. It enables us to allow or block traffic for a particular service, such as HTTP (port 80) or SSH (port 22).
Step 2: Apply the access list to the interface
access-group hr_dmz_web7 in interface hr
Example 2: Restricting High to Low Security Access
Traffic can move from higher to lower security levels by default. To enhance user experience, we intend to permit HTTP traffic exclusively from the Internal server to the DMZ.
Step 1: Create the access list.
access-list server_dmz_web2 extended permit tcp 172.16.3.0 255.255.255.0 host 172.16.1.7 eq www
Step 2: Apply the access list to the interface
access-group server_dmz_web2 in interface int_srv
Example 3: Allowing Access to Multiple Networks
IT users must access the DMZ and Internal Server. To facilitate this, we create an access list that allows IT traffic on both sides.
Step 1: Create the access list.
access-list it_acc_all extended permit ip 172.16.2.192 255.255.255.192 172.16.1.0 255.255.255.0
access-list it_acc_all extended permit ip 172.16.2.192 255.255.255.192 172.16.3.0 255.255.255.0
Step 2: Apply the access list to the interface
access-group it_acc_all in interface it
Essential ACL Management Commands
Monitor and manage your ACLs with these commands:
show  running-config access-list
show  running-config  access-group
show  access-list
clear  configur access-list [access-list-name] -> remove access-list
clear access-list access-list-name counters
note: clear configur command must be used in the configuration mode
Best Practices for Cisco ASA ACLs
1. Place specific rules first: More specific rules should appear before general ones
2. Enable logging: Monitor blocked traffic for troubleshooting
3. Test before deployment: Verify ACLs in a lab environment first
4. Use descriptive names: Name ACLs based on their function for easier management
5. Regular review: Audit ACLs periodically to remove outdated rules
6. Document your ACLs: Maintain documentation explaining the purpose of each ACL
Conclusion
Cisco ASA ACLs provide powerful traffic filtering capabilities that form the foundation of your network security posture. By properly configuring and managing these access controls, you can protect your network from unauthorized access while ensuring that legitimate traffic flows smoothly.
Whether you're implementing basic traffic filtering or complex security policies, mastering ACLs is essential for any Cisco ASA administrator. Start with simple rules and gradually build your expertise to create comprehensive security solutions for your organization.
![]()
![]()
![]()
![]()
![]()
![]()
![]()