
If you're deciding between Cisco CBS, Catalyst 1200, or Catalyst 1300 switches in 2025, here's the short answer:
✅ Catalyst 1300 – Best for advanced SMBs needing stacking, Cisco Business Dashboard, and enhanced security.
✅ Catalyst 1200 – Great for single-site deployments with solid performance and PoE+, but no stacking.
⚠️ CBS350 — Once a popular value option — has entered end-of-life (EoL) status. Cisco now recommends the Catalyst 1300 as the direct replacement for networks that previously depended on the CBS350's features and stacking capabilities.
This comprehensive guide compares these switch families across performance, management, power efficiency, security, and real-world small to medium-sized business (SMB) use cases. It’s built for IT professionals, network engineers, and procurement teams making infrastructure decisions.
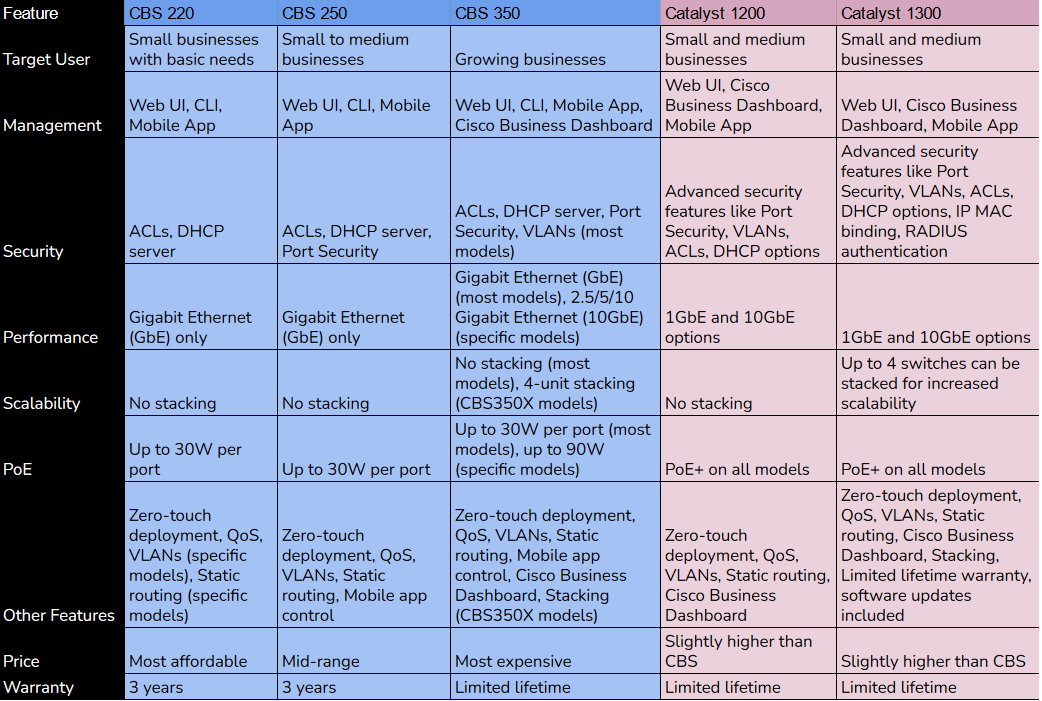
Key Differences at a Glance
| Feature Category | CBS (CBS220/250/350) | Catalyst 1200 | Catalyst 1300 |
|---|---|---|---|
| OS | Linux-based | Custom Linux OS | Custom Linux OS |
| CLI Support | CBS350 only | Full CLI | Full CLI |
| Cisco Business Dashboard | Yes (CBS350+) | Yes | Yes |
| Stacking | CBS350X (limited) | ❌ Not supported | ✅ Stackable (up to 8 units) |
| REST API | ❌ No | ✅ Yes | ✅ Yes |
| PoE/PoE+ | Available | Yes, with Perpetual PoE | Yes, with Perpetual PoE |
| Security | Standard SMB security | TPM, 802.1X, DHCP Snooping | All C1200 features + dACL, RADIUS CoA |
| CPU & RAM | Varies by model | Dual-core 1.4GHz / 1GB RAM | Dual-core 1.4GHz / 1GB RAM |
| Target Use | Cost-focused SMB deployments | Smart-managed, single-site SMBs | Growing or multi-site SMB networks |
👉 Swipe left to see mor
A Look at the Cisco Business (CBS) Series
Before the introduction of the Catalyst 1200 and 1300, Cisco’s CBS series — including the CBS220, CBS250, and CBS350 models — was the go-to solution for small and medium-sized businesses seeking reliable, cost-effective switching. While these switches were widely adopted and feature-rich for their time, Cisco is now transitioning away from this product line.
End-of-Life Status and Upgrade Path
As of 2025, both CBS250 and CBS350 models have officially reached End-of-Life (EoL) status. This means Cisco will no longer introduce new software features or hardware revisions for these models. While CBS220 remains in circulation, its long-term support is uncertain.
To support existing users and ensure future-ready deployments:
- Cisco recommends the Catalyst 1200 series as the natural replacement for CBS250 switches.
- For networks that previously depended on CBS350’s stacking and advanced features, the Catalyst 1300 series is the direct successor.
Key Features and Limitations
- Management: CBS switches are primarily managed through a Web UI. CBS250 and CBS350 models also support the Cisco Business Dashboard and the Cisco Business Mobile App. CLI is limited to CBS350 and lacks the depth found in Catalyst models.
- Stacking: CBS350X models offer limited virtual stacking, which lacks the unified configuration and redundancy found in Catalyst 1300’s hardware stacking.
- Automation & APIs: The CBS series does not support REST APIs, making it less suited for automated, programmatic environments.
- Security: Standard Layer 2 features like ACLs and 802.1X are included, but advanced access control and monitoring capabilities are limited.
The Verdict: A Phased-Out Workhorse
The CBS series served SMBs well for many years, offering dependable Layer 2 switching, PoE support, and VLAN management at a competitive price. However, modern network demands—such as advanced security, centralized management, and scalability—have outgrown the capabilities of these models.
For long-term network growth and support, Cisco strongly recommends transitioning to the Catalyst 1200 and 1300 series.
Cisco Catalyst 1200 and 1300: Built for Modern SMB Networks
The Cisco Catalyst 1200 and 1300 Series are the latest smart-managed switches designed for small and medium-sized businesses. These models replace legacy CBS switches with stronger performance, improved security, and simplified management options.
Both series offer enterprise-grade reliability without the complexity of full Layer 3 platforms. Whether you're managing a single office or expanding to multiple locations, the Catalyst 1200 and 1300 provide a solid, scalable network foundation.
Key Features and Advantages
- Smart Management: Both models support a Web UI, full CLI, SNMP, REST API, and Cisco Business Dashboard (CBD) for centralized monitoring and configuration.
- Scalability: The Catalyst 1200 is ideal for single-site deployments. The Catalyst 1300 features hardware stacking for up to eight units, making it well-suited for growing networks.
- Power over Ethernet: Both support PoE+ and Perpetual PoE, ensuring that connected devices, such as IP phones and cameras, stay powered even during reboots.
- Built-in Security: A Cisco Trust Protection Module (TPM) helps defend against device spoofing, unauthorized firmware changes, and credential theft.
- Energy Efficiency: These switches are up to 58% more energy efficient compared to older CBS models, reducing overall power consumption.
- Support and Licensing: The Catalyst 1200 and 1300 come with a lifetime hardware warranty, one year of Cisco Help Desk support, and free software updates, with no license fees required.
For businesses upgrading from CBS250 or CBS350, the Catalyst 1200 and 1300 are the recommended replacements, offering a modern, secure, and flexible networking solution backed by Cisco’s trusted performance.
Catalyst 1200 vs. Catalyst 1300: Which to Choose?
While both series offer the same core advantages, such as enhanced security, modern management, and PoE+ support, the key difference lies in scalability. Your ideal choice depends on the size of your network and how much you expect it to grow.
Cisco Catalyst 1200: This series is best suited for standalone deployments such as single-site offices, retail stores, or small branch locations. Each switch is managed individually, making it a simple and cost-effective solution for flat networks where stacking or multi-site coordination is not required.
Cisco Catalyst 1300: Built for expanding environments, this series supports hardware stacking of up to eight switches. This means you can manage multiple switches as a single logical unit with a single IP address. It simplifies configuration, improves inter-switch performance, and provides centralized control. This makes it ideal for growing SMBs or networks with multiple wiring closets.
Cisco CBS vs. Catalyst 1200/1300: Picking the Right Switch for Your Business
Selecting the right network switch is a critical foundation for your business. Cisco offers two popular series aimed at small and medium-sized businesses: the legacy Cisco Business (CBS) series and the modern Cisco Catalyst 1200/1300 series.
While both are designed for ease of use, the Catalyst series is the direct successor to the CBS line, offering significant upgrades in security, performance, and long-term value.
Management
- CBS: Web UI and mobile app (CBS350). Limited CLI and no REST API on CBS220/250.
- Catalyst 1200/1300: Full support for Web UI, CLI, SNMP, REST API, and CBD.
Security
- CBS: Basic ACLs, 802.1X
- C1200: Adds TPM
- C1300: Adds dACLs and RADIUS CoA
Speed & Performance
- All offer Gigabit/Multi-Gig
- Catalyst 1200/1300: Dual-core 1.4GHz CPU, 1GB RAM
PoE
- All support PoE/PoE+
- Catalyst 1200/1300: Also offers Perpetual PoE
Stacking & Scalability
- CBS: Only CBS350X supports virtual stacking
- C1200: No stacking
- C1300: Hardware stacking (up to 8 switches)
The chart above compares CBS switches with C1200/1300 switches.
Next, we will cover various major features delivered by the CBS and Catalyst C1200/C1300 switches, i.e. Cisco Business Dashboard CBD, Day 0 Configuration, Stacking Mobile App, Software Firmware updates and upgrades.
Cisco Business Dashboard (CBD): Centralized Management for Your Network
The Cisco Business Dashboard (CBD) is a flexible management platform that simplifies the deployment, monitoring, and configuration of the entire Cisco Business family of devices, including the latest Catalyst 1200 and 1300 series switches.
It is designed to be deployed where you need it: on a local PC or server, as a virtual appliance, or in a public cloud. This flexibility allows IT teams to manage multiple switches across various sites with ease, providing a single pane of glass for automation, visibility, and control.
Key Benefits of CBD
Simplified Setup and Monitoring
- Zero-Touch Deployment: Set up and provision new switches automatically, eliminating the need for physical access.
- Real-Time Insights: Monitor traffic, device health, and network-wide alerts from one intuitive dashboard.
- Bulk Configuration: Push consistent settings and policies to multiple switches simultaneously.
- Mobile App Companion: Works with the Cisco Business Mobile App for on-the-go monitoring and troubleshooting.
Advanced Network Control
- Centralized Firmware Updates: Keep all your switches secure and current with the latest features and patches.
- QoS Prioritization: Easily optimize bandwidth for critical business applications like voice and video.
- VLAN Management: Segment network traffic to improve overall performance and security.
- Analytics and Reporting: Gain valuable insights into usage patterns and network behavior to optimize performance.
Scalability and Integration
- Multi-Tenancy: Manage multiple independent customer or site networks from a single dashboard with secure, role-based access.
- Stacking Integration: CBD works seamlessly with the Catalyst 1300’s hardware stacking, allowing you to manage a stack of up to eight switches as one logical device.
- API for Integration: A built-in REST API enables custom integration with other network management systems and productivity tools.
CBS Management Options
While the CBS series does not offer full CBD integration, it still provides several basic management tools:
- Web Interface – Configure settings directly through a browser-based GUI.
- CLI (Command Line Interface) – Available on CBS350 for more advanced configuration.
- Cisco Business Mobile App – CBS350 supports limited remote setup and monitoring through the app.
For small networks with simple requirements, CBS switches may still provide sufficient management functionality. However, if you require centralized control, remote provisioning, or real-time network visibility, upgrading to a Catalyst 1200 or 1300 with full CBD support is the more intelligent long-term choice.
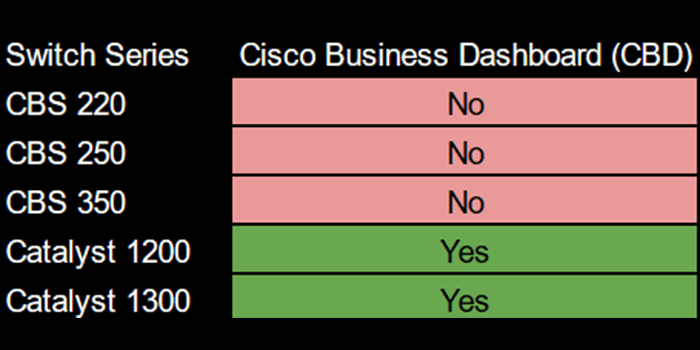
CBD is currently available for the more advanced Catalyst series switches, including the Catalyst 1200 and 1300, as well as other Cisco Business products, such as access points and routers.
Here's a table summarizing the availability of CBD for the switches we mentioned:
Initial Setup: Cisco Business Dashboard Configuration
Cisco Business Dashboard (CBD) is distributed as a virtual machine image in compressed OVF format, ready for deployment on most common hypervisors. It can be installed on platforms including:
- VMware vSphere, Workstation, and Fusion
- Microsoft Hyper-V
- Oracle VirtualBox
- Microsoft Azure and Amazon Web Services (AWS)
- Ubuntu Linux (Dashboard and Probe)
- Raspbian Linux (Probe only)
1. Connect to the console of the dashboard using the appropriate tools for your hypervisor if using a virtual machine or by connecting to your AWS or Azure instance using SSH
2. If using a virtual machine, log in using the default username and password, set to 'cisco'. For an AWS instance, use the key pair you specified when the instance was created and the username: cisco. For an Azure instance, use the administrator username and password or key you specified when creating the instance.
You will be required to change the password for the Cisco account immediately after logging in. The new password should be a complex, non-dictionary word using a mixture of character types.
3. Enter the command sudo config_vm to perform the initial configuration. When prompted, enter the password for the Cisco account. The config_vm utility will prompt you with a series of steps to change the platform settings.
4. First, you will be prompted to change the hostname for the dashboard. The hostname is used to identify the dashboard on the network. Choose a meaningful name here, or skip this step to keep the default hostname.
5. You will be prompted to change the web server ports next. If these ports are changed from the default values, it may also be necessary to change firewall settings in your network or security group settings in AWS or Azure.
6. Next, you will be prompted to configure the network interface. The options here are static and dhcp (the default). If you select static, you will be prompted for IP address information, default gateway, and DNS server addresses. The network interface will be reset if you make changes here.
7. Next, you will be prompted to configure the time settings for the dashboard. You can opt to configure one or more NTP servers for time synchronization (recommended), and you will be prompted to select your time zone.
8. Finally, you will be asked if you wish to change the bootloader password. The bootloader username and password can be used on the console at system startup to change the system boot process or recover lost operating system passwords. The default bootloader credentials are username: root and password: cisco.
Launching the Cisco Business Dashboard Interface
Once the initial configuration is complete, follow these steps to access the Cisco Business Dashboard (CBD) via a web browser:
Accessing the Dashboard
1. Open a Web Browser
Use a modern browser such as Google Chrome or Microsoft Edge.
2. Enter the Dashboard Address
In the address bar, enter the IP address or hostname assigned during setup, then press Enter.
3. Login Credentials
Default username: cisco
Default password: cisco
For AWS deployments, the instance ID is used as the default password. You can find it in the AWS EC2 console.
4. Change the Default Credentials
Upon first login, you’ll be prompted to change the default username and password. The new password must include at least 8 characters and 3 different character types (e.g., uppercase, lowercase, number, symbol).
5. Review Data Sharing Policies
You'll be presented with Cisco’s data usage and privacy terms. Adjust settings according to your organization’s preferences.
6. System Setup Wizard (Optional)
After login, you can choose to run the System Setup Wizard, which guides you through initial configuration. You may click Next to proceed through the wizard or Finish to exit and configure manually.
Setup Wizard Overview
If you choose to continue with the setup wizard, it will walk you through:
- Platform Settings
Configure network, web server ports, and security options. - License Settings
Enter license information (typically only needed if managing over 25 devices). - Notification Setup
Configure email forwarding for system alerts and status updates. - Organization Setup
Add multiple organizations for managed services or multi-site deployments. - User Management
Create additional user accounts for administrators or team members. - Local Probe Settings
Enable or disable the Local Probe, used for device discovery and monitoring.
Day Zero Configuration and Initial CLI Setup
Day Zero refers to the first-time configuration of a switch, right after it is unboxed and powered on. This setup can be done through the CLI, web interface, or Cisco Business Mobile App.
CBS Series (CBS220 / CBS250 / CBS350)
- Basic Setup Options: The CBS series allows initial configuration through the Web UI or CLI. The CBS350 also supports a limited setup using the Cisco Business Mobile App.
- Limited Automation: Some CBS models offer simplified onboarding, but they do not support Cisco Business Dashboard (CBD) for centralized zero-touch deployment or advanced automation features.
Catalyst 1200 and 1300
- Zero-Touch Deployment Ready: Both Catalyst 1200 and 1300 support Cisco Business Dashboard, allowing centralized management and automated provisioning.
CBD Advantage: Using CBD, administrators can remotely configure devices, schedule updates, and monitor device status from a single interface.
CLI Setup Example for Catalyst 1300
Step 1:
Connect a console cable from your computer to the switch.
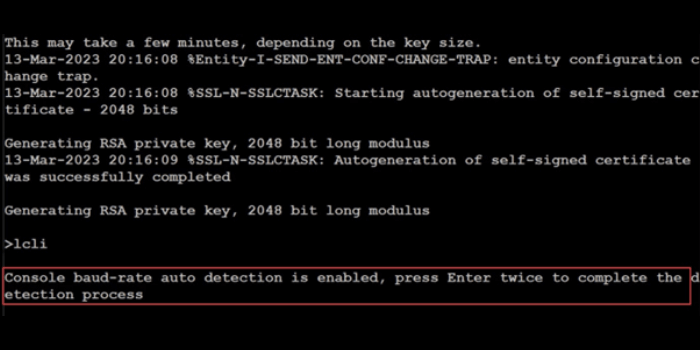
Step 2:
Press Enter twice to complete the console baud-rate detection.
Step 3:
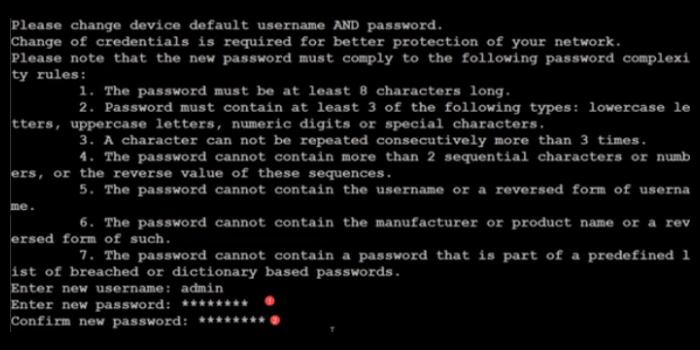
Log in with the default credentials:
Username: cisco
Password: cisco
You will be prompted to set a new username and password.
Step 4:
Set a new administrator username and password:
Enter new username: admin
Enter new password: ********
Step 5:
Enter global configuration mode:
switch# config terminalStep 6:
Assign an IP address to VLAN1:
switch(config)# interface vlan1
switch(config-if)# ip address 172.16.1.100 255.255.255.0
Step 7:
Configure the default gateway:
switch(config)# ip route 0.0.0.0 0.0.0.0 172.16.1.60Step 8:
Enable SSH authentication using local credentials:
switch(config)# ip ssh-client authentication passwordStep 9:
Exit configuration mode:
switch(config)# exitStep 10:
Save the configuration:
switch# write memoryStep 11:
Confirm the save action:
Overwrite file [startup-config]... (Y/N) [N]? YStacking Configuration: CBS350 and Catalyst 1300
Stacking allows multiple network switches to operate as a single logical unit. This improves scalability and simplifies management by creating one virtual switch with unified control, shared configuration, and increased port capacity.
What is Stacking?
When switches are stacked, they are physically connected and configured to share a single management plane. The result is a network topology that behaves like one larger switch, reducing complexity in environments with multiple wiring closets or growing port needs.

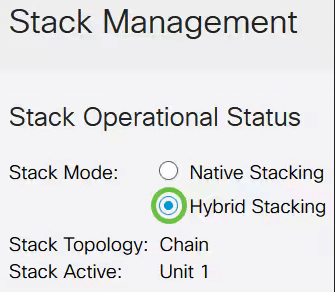
Stacking in CBS350
Here, the CBS 350 switch stacking feature is used as an example. The stack structure shows whether its topology is in chain or ring form. Here, it is a chain topology.
The active switch in a stack displays the unit ID of the Active unit of the stack. Given here, it is being defined (Unit 1) as the Active of the stack.
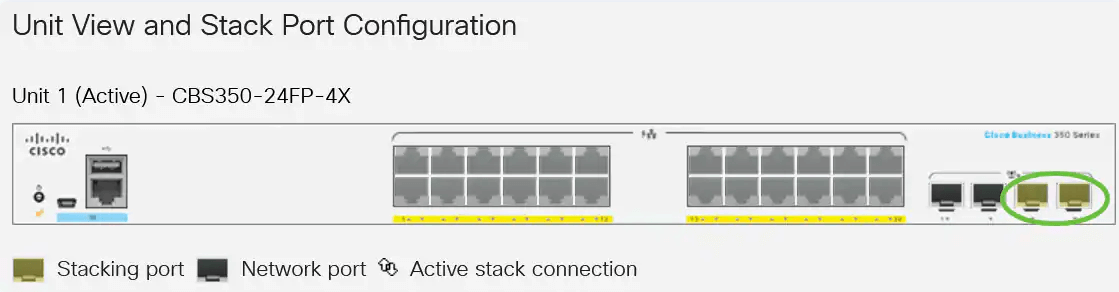
Choose a unit ID from the drop-down list or choose Auto to have the unit ID assigned by the system.
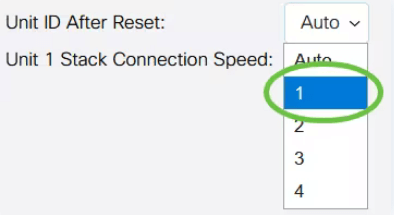
In this example, 1 is chosen.
The Unit x Stack Connection Speed displays the speed of the stack connection.
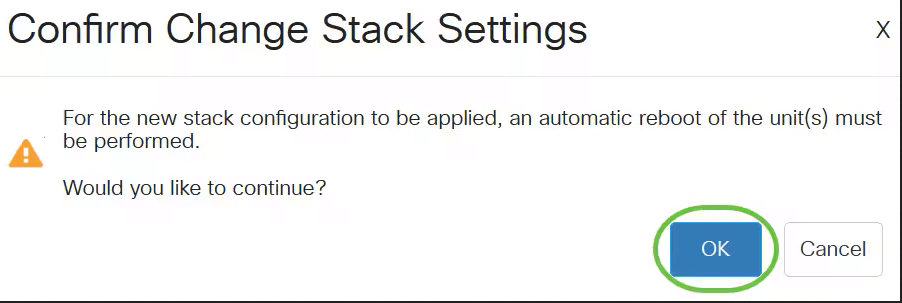
Click Apply and Reboot.

Once prompted by the pop-up message, click OK. The settings are copied to the running configuration file, and the stack is rebooted.
Log in to the web-based utility of your switch.
You will be required to set a new password for enhanced network protection.
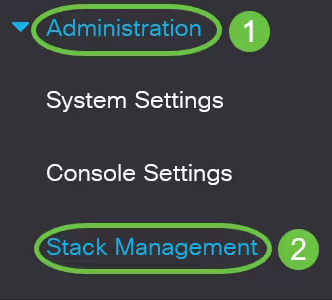
Choose Administration > Stack Management. The switch should display the configured settings on the Active switch.
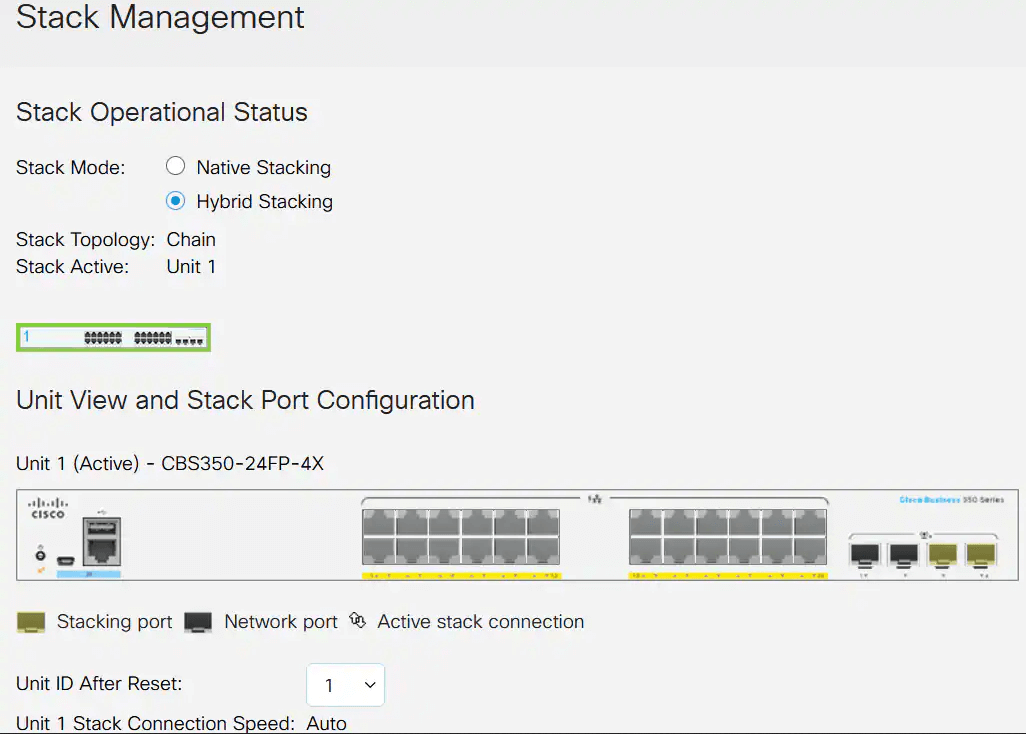
You have now configured the stack settings of your Active unit.
Configuring Stack Settings on the Standby or Member Switch
Log in to the web-based utility of your switch, then choose Administration > Stack Management.
Alternatively, you can click the Manage Stack option under Initial Setup on the Getting Started page.

Click an option for the Stack Mode. The options are:
- Native Stacking: All switches in the stack are the same model.
- Hybrid Stacking: The stack includes compatible but different CBS350 models.
Cisco Business Mobile App
The Cisco Business Mobile App allows administrators to set up and manage supported Cisco Business devices using a mobile-friendly interface. It provides a centralized setup experience for wireless networks, switches, and access points.
Supported Devices:
- Cisco Business 220, 250, and 350 Series Switches
- Cisco Catalyst 1200 and 1300 Series Switches
- Cisco Business Wireless Access Points
Availability:
The app is available on the Google Play Store (Android) and the Apple App Store (iOS).
Key Functions
- Add, delete, or modify devices on the network
- Create and configure new sites
- Set up wireless networks and advanced settings
- Perform basic switch and AP deployments
- View a summary of configuration before deployment
Cisco business mobile app configuration and usage
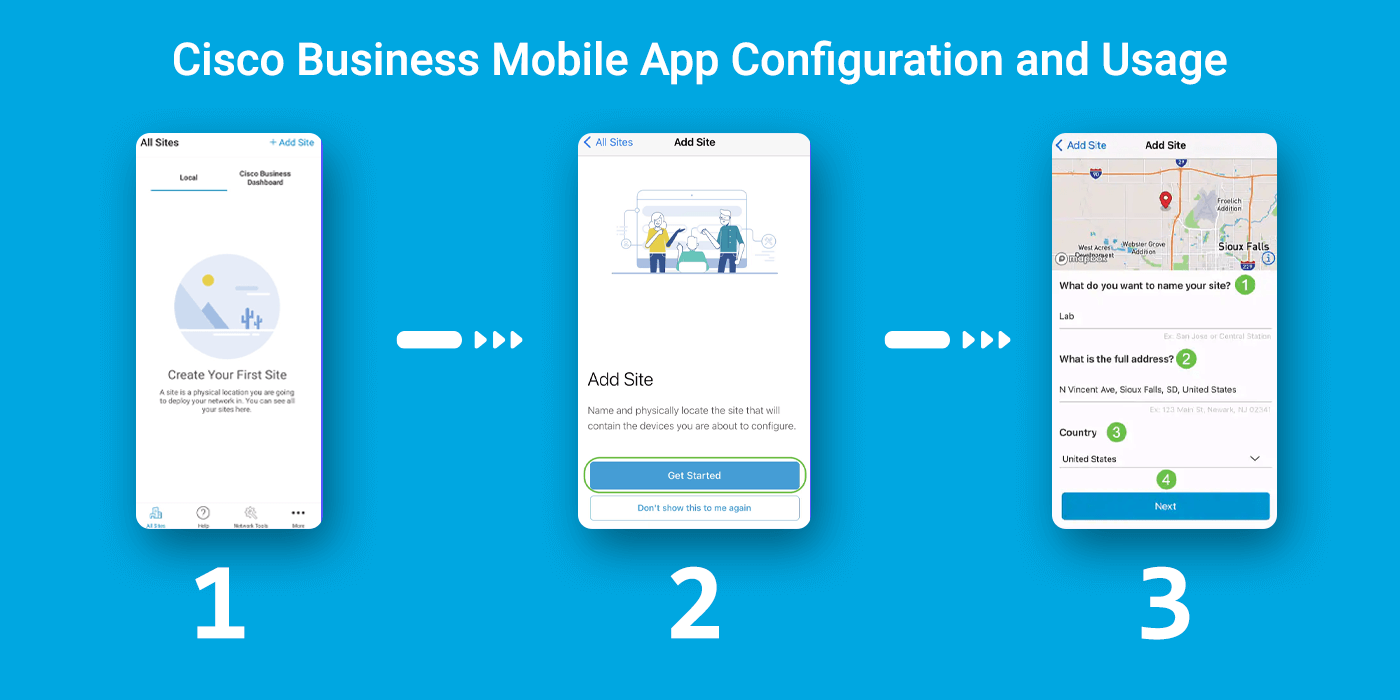
Step 1: To create a location for your network, click on + Add Site.
Step 2: Then, Click on "Get Started."
Step 3: Configure the name of your site, address, and Country, and click Next.
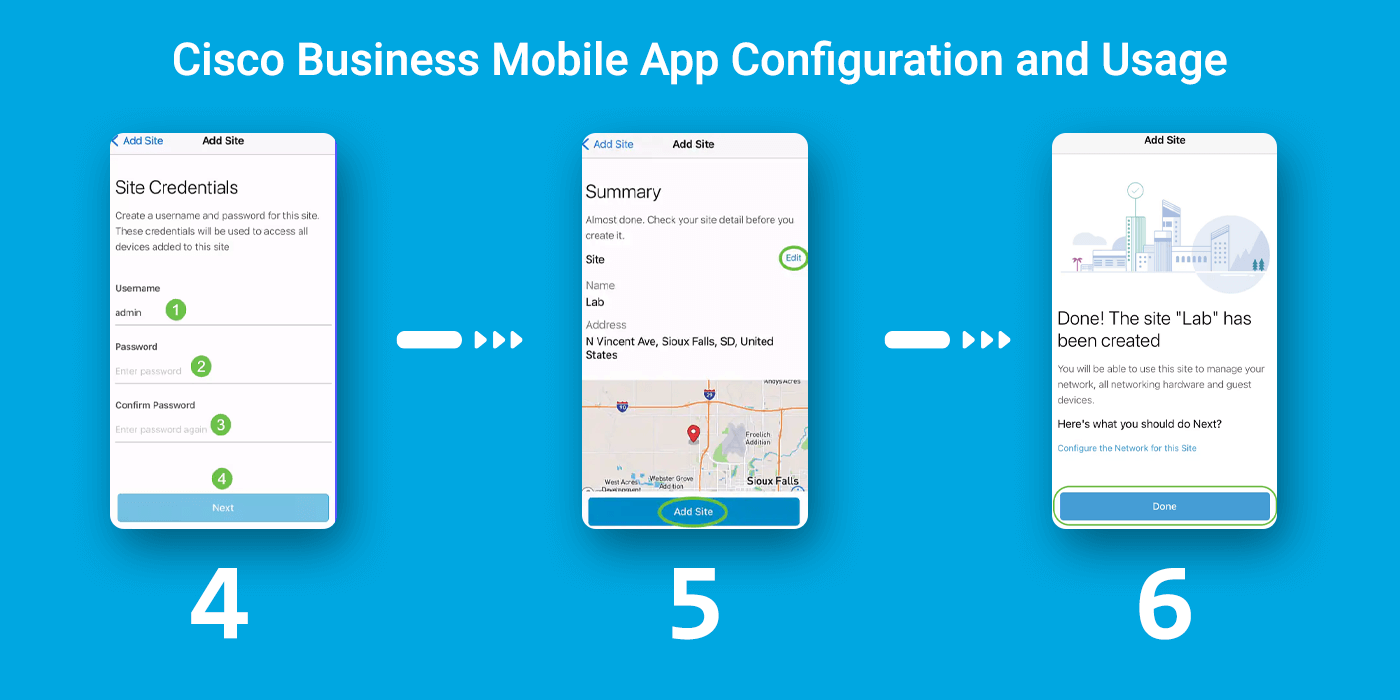
Step 4: Enter a Username and Password for the site and click Next.
The credentials will be used to access the devices at this site.
Step 5: You will see the Summary screen. To make any changes, click Edit. If you are all set, click Add Site.
Step 6: Click Done.

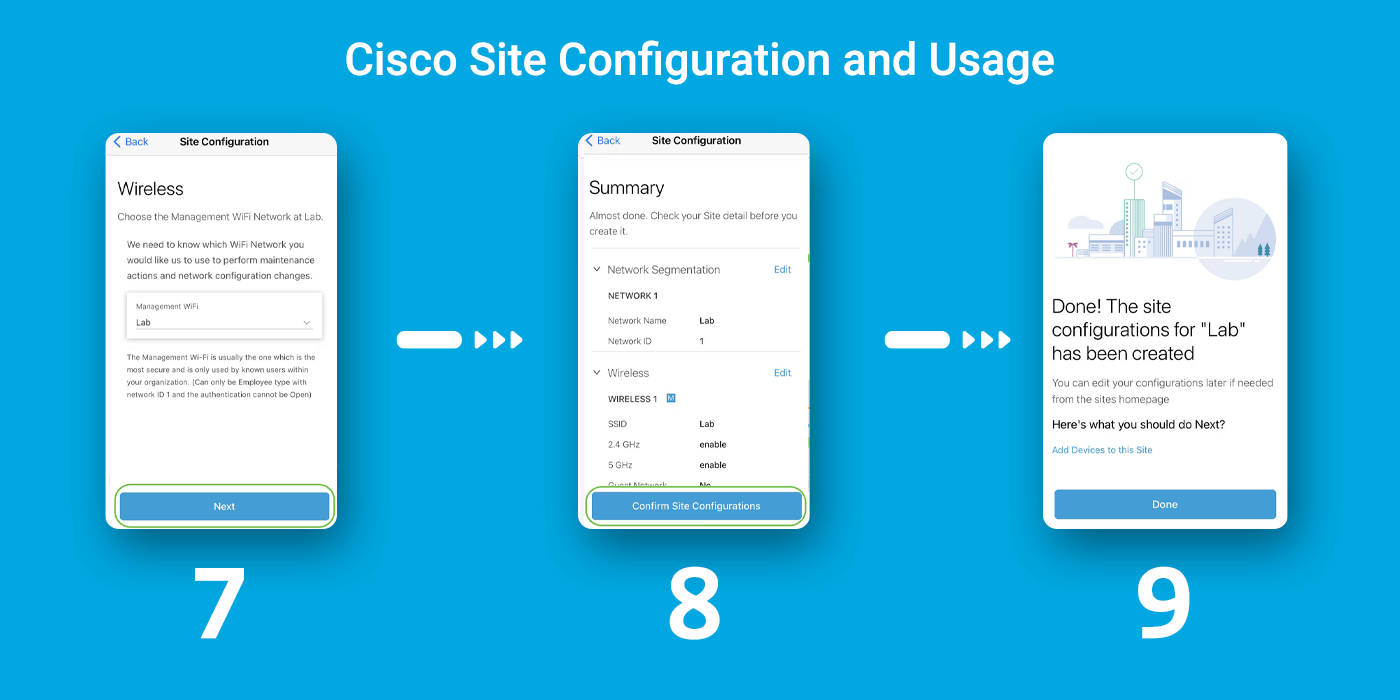
Site Configuration
To configure the site, follow the steps:
Step 1: Click on Get Started.
Step 2: Choose an option to configure the wireless settings in your network. In this example, yes, I would like to be selected.
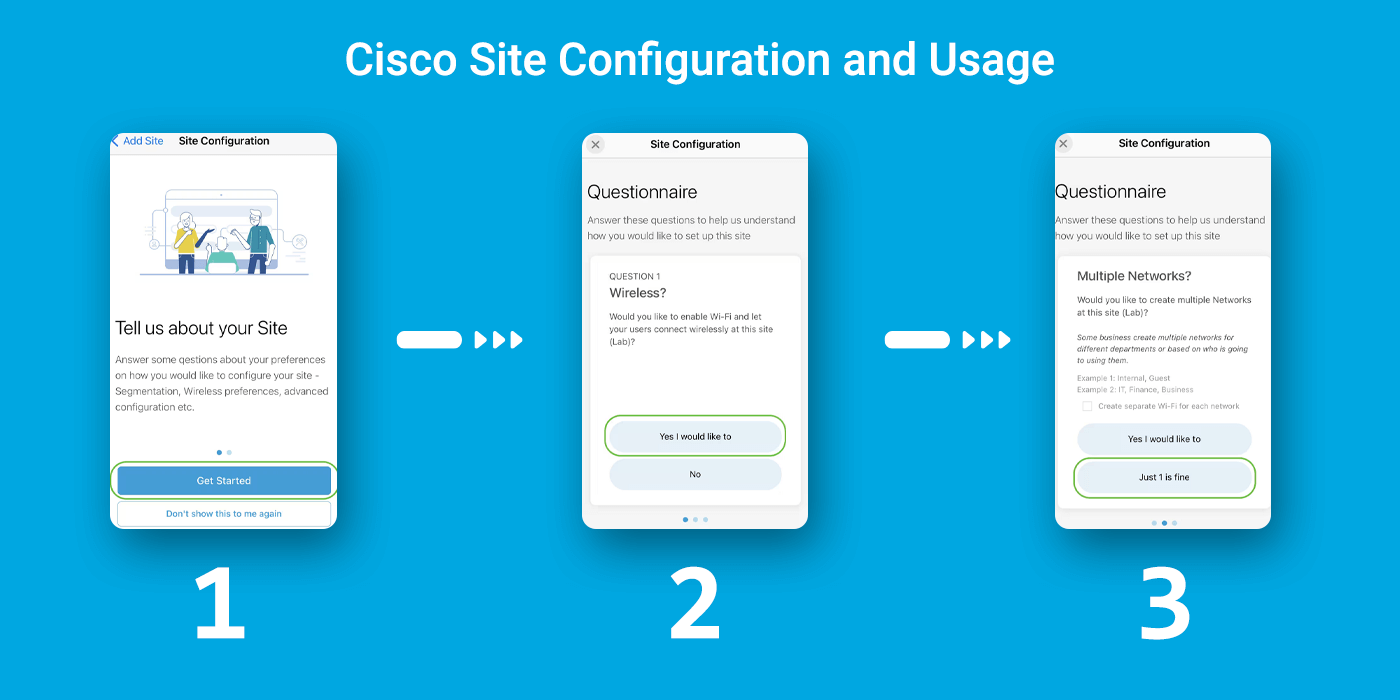
Step 3: If you have multiple networks, you have the option to configure them. In this example, Just 1 is fine is selected.
Step 4: You can configure the Advanced Settings either manually or automatically. In this example, Do it automatically is selected. Click Continue.
Step 5: Enter a Network Name and click Next.
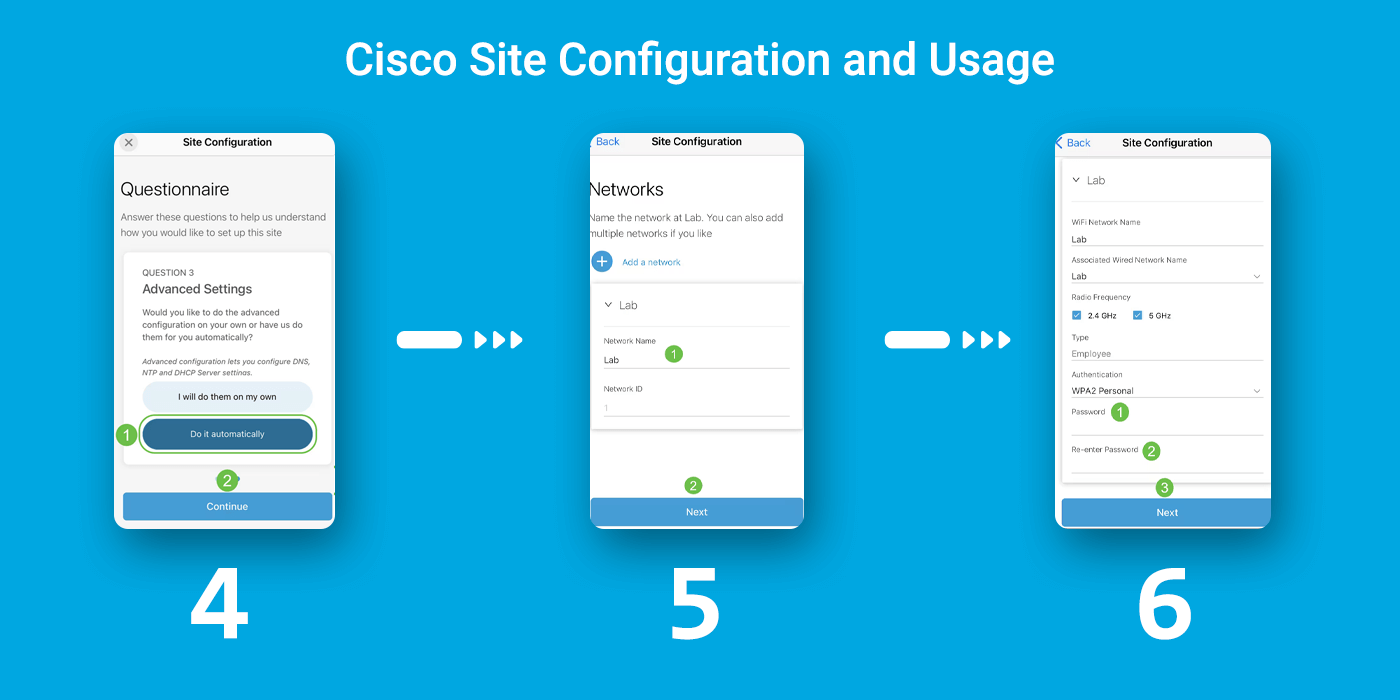
To add more networks, click + Add a network.
Step 6: Enter a Password for your network and click Next.
Step 7: Click Next to proceed.
Step 8: Check the details in the Summary screen. Click on the Confirm Site Configurations button to complete the setup.
Step 9: Click Done.
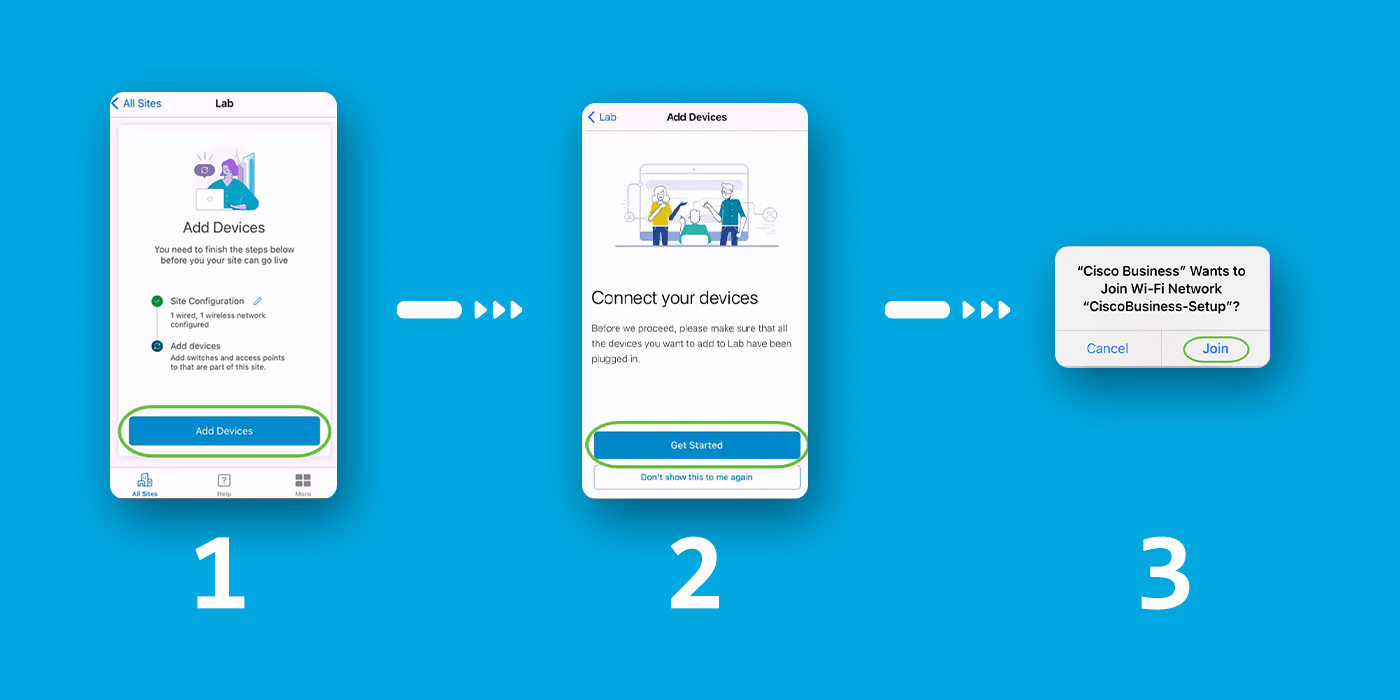
Add Devices
To add devices, follow these steps:
Step 1: Click "Add Devices."
Step 2: Click "Get Started."
Step 3: Click Join to join the default Cisco Business-Setup SSID.
Ensure the wireless access point is fully booted up and in factory default settings.
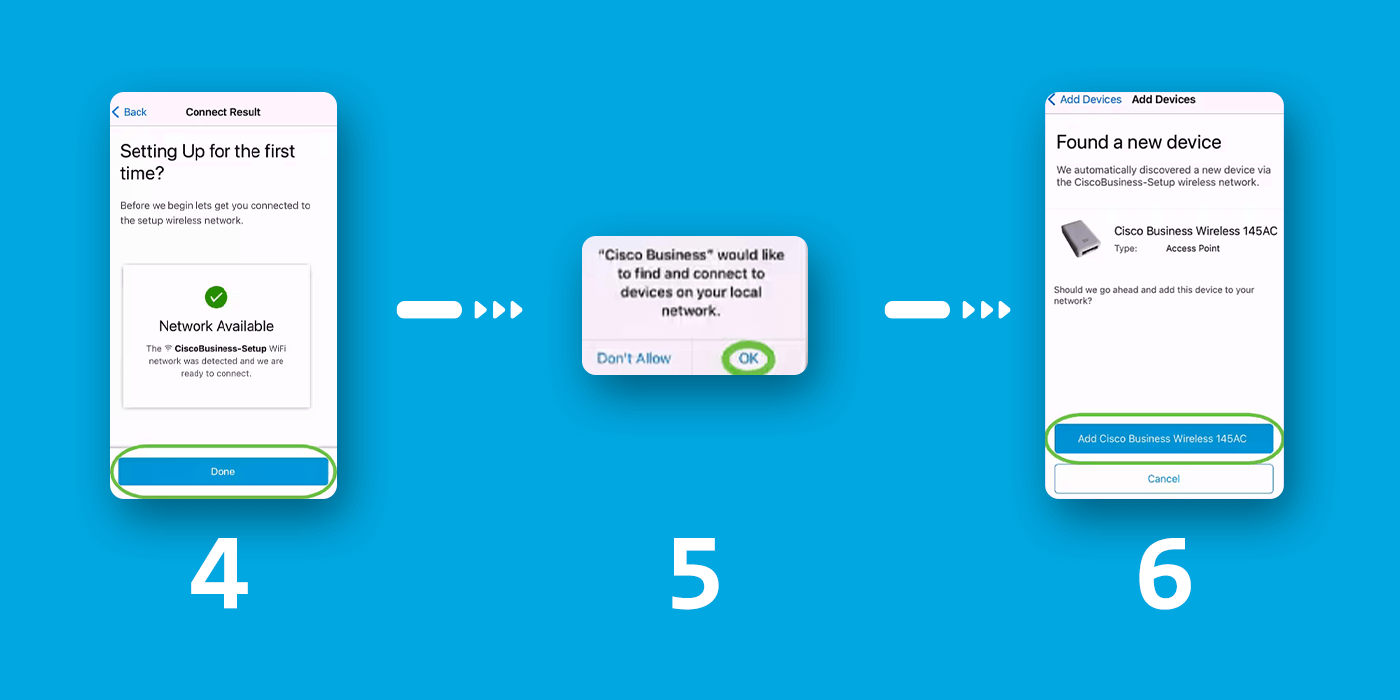
Step 4: Click Done after the connection is detected.
Step 5: Click OK to allow the Cisco Business network to find and connect to Cisco Business devices.
Step 6: The access point will be detected. In this example, it is a Cisco Business Wireless 145AC access point. Click Add Cisco Business Wireless 145AC.
Step 7: A Summary of the device and settings will be displayed. Click Confirm Add Device.
A screen will appear displaying the progress of adding the device.
Step 8: Click Join to allow the access point to join the network you created.
Step 9: You will see a screen showing that the device was successfully deployed. You can choose to Add more devices or click Done. In this example, Done is selected.
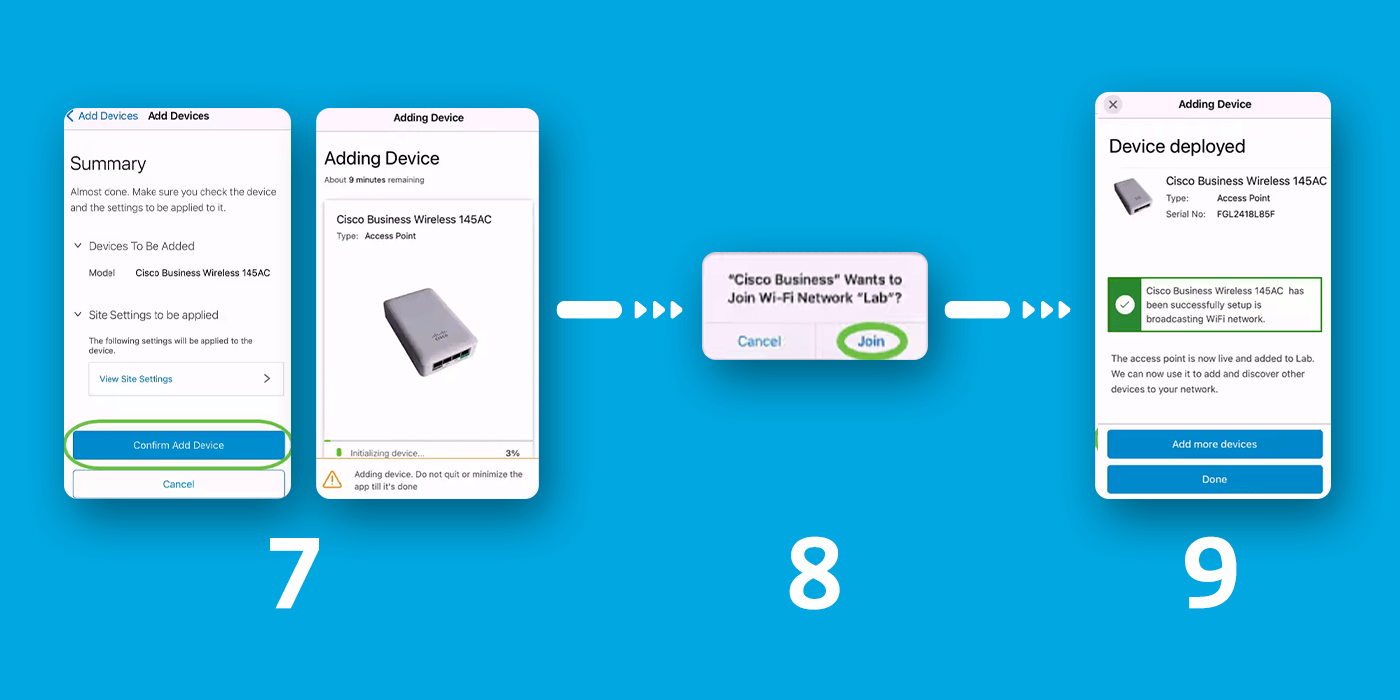
Step 10: Click Done to proceed.
Step 11: You will be navigated to the main page. If you have more devices to be added, click on + Add Devices.
Step 12: Select the Get Started option.

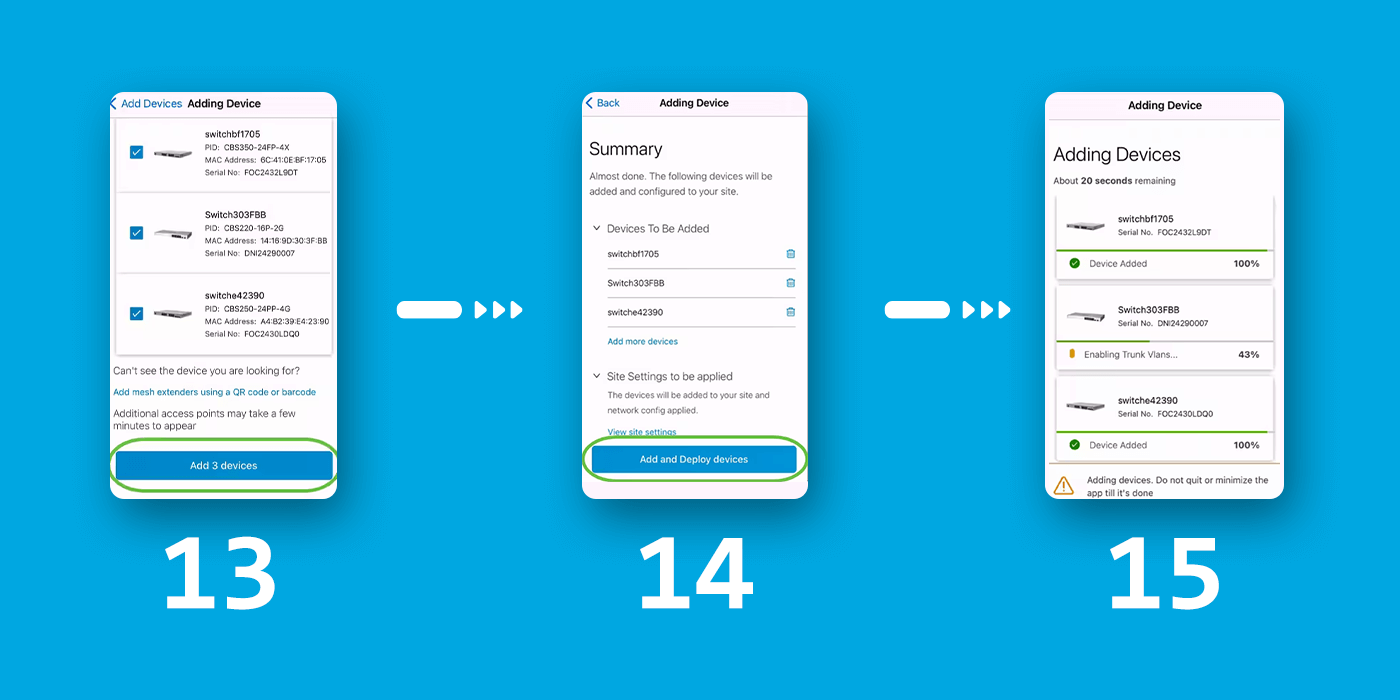
Step 13: The detected devices will be displayed. In this example, three devices were detected. Click the Add 3 devices button.
Step 14: A Summary of the devices to be added will appear. Click on Add and Deploy devices.
The devices will be configured and added. The initial configuration will be performed on the devices on day zero. Do not close the app while this process is in progress.
Step 15: Click Done.
Software and Firmware Updates
Keeping your firmware up to date is essential for maintaining network security and optimal performance. Cisco offers multiple update methods depending on the device series.
CBS Series (220, 250, 350)
- Web Interface: Updates can be uploaded and installed through the switch's browser-based interface.
- Mobile App (CBS350 only): Basic firmware updates can be performed via the Cisco Business Mobile App.
- CLI: Advanced users can update firmware using command-line instructions.
Catalyst 1200 and 1300 Series
- Cisco Business Dashboard (CBD): Provides centralized firmware update scheduling, status tracking, and bulk upgrade capabilities.
- Web Interface: Updates can also be performed via the local browser interface.
- CLI: Command-line access allows direct control for experienced administrators.
Conclusion and Recommendation
Cisco CBS Series:
An effective solution for small businesses needing basic networking functionality. Suitable for stable, low-complexity environments that do not require advanced scalability or centralized control.
Cisco Catalyst 1200 and 1300:
These models are designed for modern business needs. With features such as full CBD support, advanced security, and energy-efficient operation, they offer a future-ready upgrade path. Additionally, support for features like Dying Gasp enhances system resilience during power failures.
For SMBs looking to future-proof their infrastructure, the Catalyst 1200 and 1300 Series provide a robust foundation with simplified management and superior scalability.
![]()
![]()
![]()
![]()
![]()
![]()
![]()